
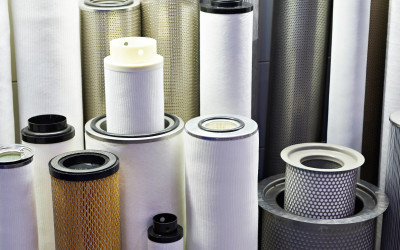
How to find a Replacement Compressed Air Filter Element
Ultramax Systems on 16th Oct 2026
Short answer: To find a replacement compressed air filter element, start with the part number on the old element and the model on the housing nameplate. Note the brand, grade, size, flow, pressure rating and connection size, then search those numbers in a cross-reference tool. If the label is missing, measure the element's length, diameters, end caps and O-rings. Replace like with like on grade, and change elements at the maker's interval as well as on differential pressure.
What you will achieve
This guide takes you from an unknown element to a confirmed replacement part number. Getting the match right matters for two reasons. An element that does not seal lets contaminated air bypass the media, and the wrong grade changes the air quality your equipment receives.
Safety note
A filter housing holds compressed air, and opening it under pressure can throw the bowl or element with force. Isolate the housing, then vent it to zero before you loosen anything. SafeWork NSW (n.d.) lists gases under pressure, including air, as an energy source to isolate, and calls for any remaining stored energy to be relieved before work starts. Follow the housing maker's instructions and your site's isolation procedure. Wear eye protection when you vent the housing and remove the bowl.
What you need
- A phone camera to photograph both labels before you remove anything.
- A steel rule or tape measure, and vernier callipers for the diameters.
- Gloves, because used elements can be oily and dirty.
- The compressor or filter service manual if you have it.
Step-by-step: identifying the element
1. Read the housing nameplate
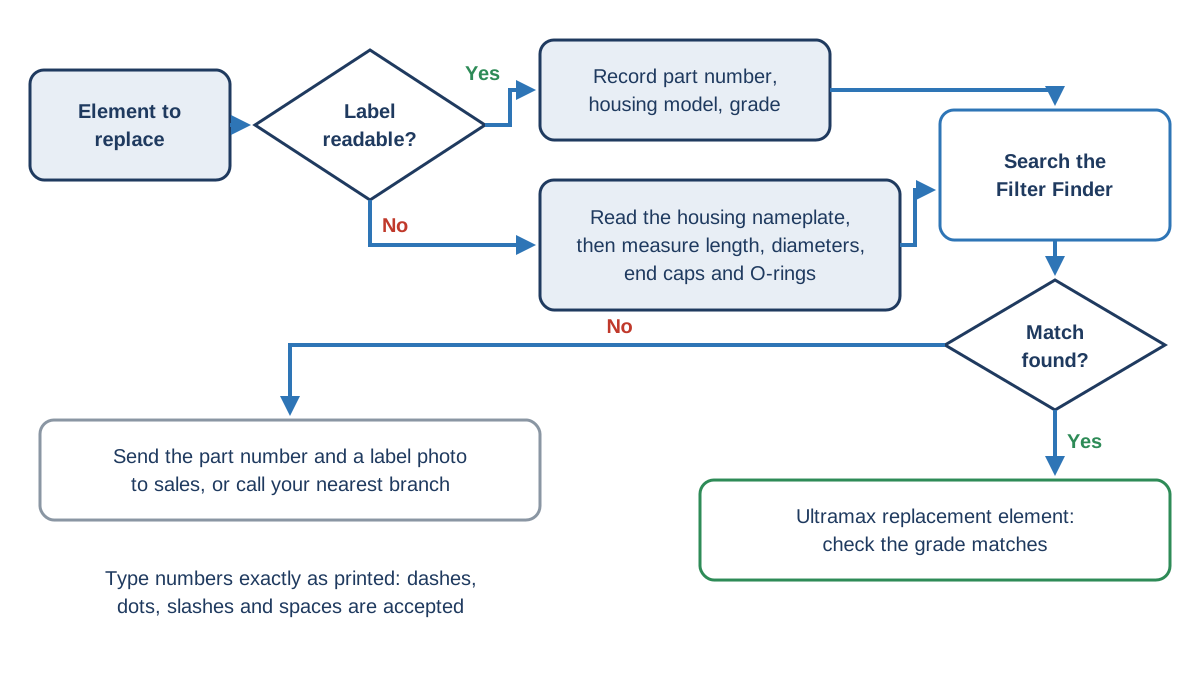
Start with the housing, because it outlasts many elements. The nameplate or cast body usually shows the brand, model number, connection size and maximum working pressure, and sometimes the rated flow. The housing model alone often narrows the search to one element size, with a choice of grades. Photograph it, because labels fade.
2. Read the element label
Once the housing is depressurised, remove the bowl and the element. The element label or end cap typically shows the maker's part number, which encodes the size and the grade. Many makers use a letter or short code for the grade, but the codes differ from brand to brand, so do not assume two brands' letters mean the same thing. Check for a flow direction arrow too. Many coalescing elements flow from inside to outside, but some flow the other way, so note which.
3. Record the details
Write down everything in one place before you search. A complete record lets a supplier confirm a match quickly.
- OEM part number of the element, exactly as printed.
- Housing brand and model number.
- Grade: particulate, coalescing (general purpose or high efficiency), activated carbon or other.
- Rated flow and maximum working pressure of the housing.
- Connection size and thread type of the housing ports.
- Where the filter sits in the system, for example before or after the dryer.
4. Measure the element if the label is missing
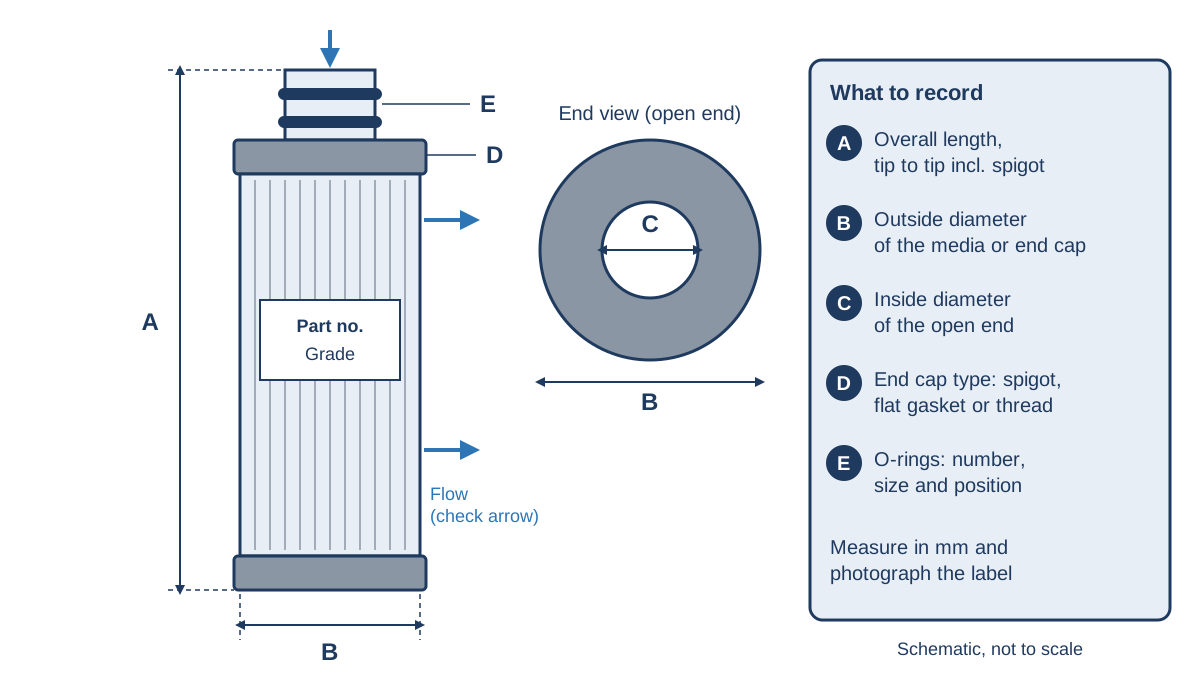
When the label has gone, the element's dimensions become its fingerprint. Measure the overall length from tip to tip, including any spigot or adaptor. Measure the outside diameter of the media or end cap, then the inside diameter of the open end. Note the end cap style, such as a spigot with O-rings, a flat gasket or a threaded connection. Finally, count the O-rings and note their size and position. Record everything in millimetres and photograph the element beside the rule. Dimensions confirm whether an element will physically fit, but they do not identify its grade. Use the housing model and the filter's position in the system to work that out.
5. Search the Filter Finder
With your numbers in hand, use the Ultramax Filter Finder. Type the element part number or housing number exactly as it appears on the label, nameplate or service manual. The tool accepts dashes, dots, slashes and spaces, so there is no need to reformat the number. It returns the matching Ultramax replacement element for that number. You can also browse the original and alternative filter elements range by brand. If nothing matches, send the part number and a photo of the label to our sales team or call your nearest branch, because new cross-references are added regularly.
Ultramax also manufactures its own filter ranges, including the Oxair elements. The Oxair OG range, for example, is grouped by housing size and grade letter, which shows how one housing can take several grades of element.
6. Replace like with like on grade
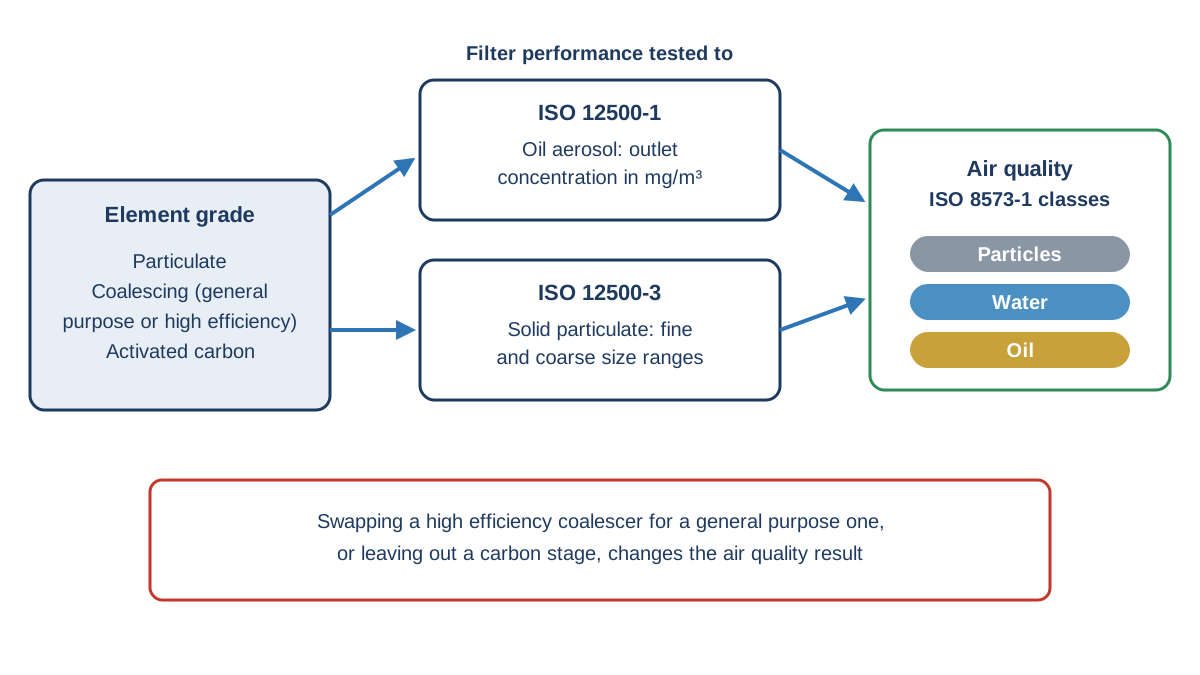
Match the grade of the element you are replacing unless a qualified person has reviewed the air quality the process needs. Filter performance is tested to the ISO 12500 series. ISO 12500-1 rates coalescing filters on outlet oil aerosol concentration in mg/m³ (ISO 12500-1:2007), while ISO 12500-3 covers solid particulate removal across fine and coarse size ranges (ISO 12500-3:2009). The air quality those filters help achieve is then expressed as ISO 8573-1 purity classes for particles, water and oil (ISO 8573-1:2010). Swapping a high efficiency coalescer for a general purpose one, or leaving out a carbon stage, changes that result. For a refresher on reading the classes, see Understanding ISO 8573-1:2010.
7. Fit the new element and record the date
Check that the new element's O-rings or gasket are present and undamaged, and clean the sealing faces in the housing head. Seat the element firmly in the correct flow direction, refit the bowl and pressurise slowly. Check for leaks, then record the change date in the maintenance log.
Change intervals and differential pressure
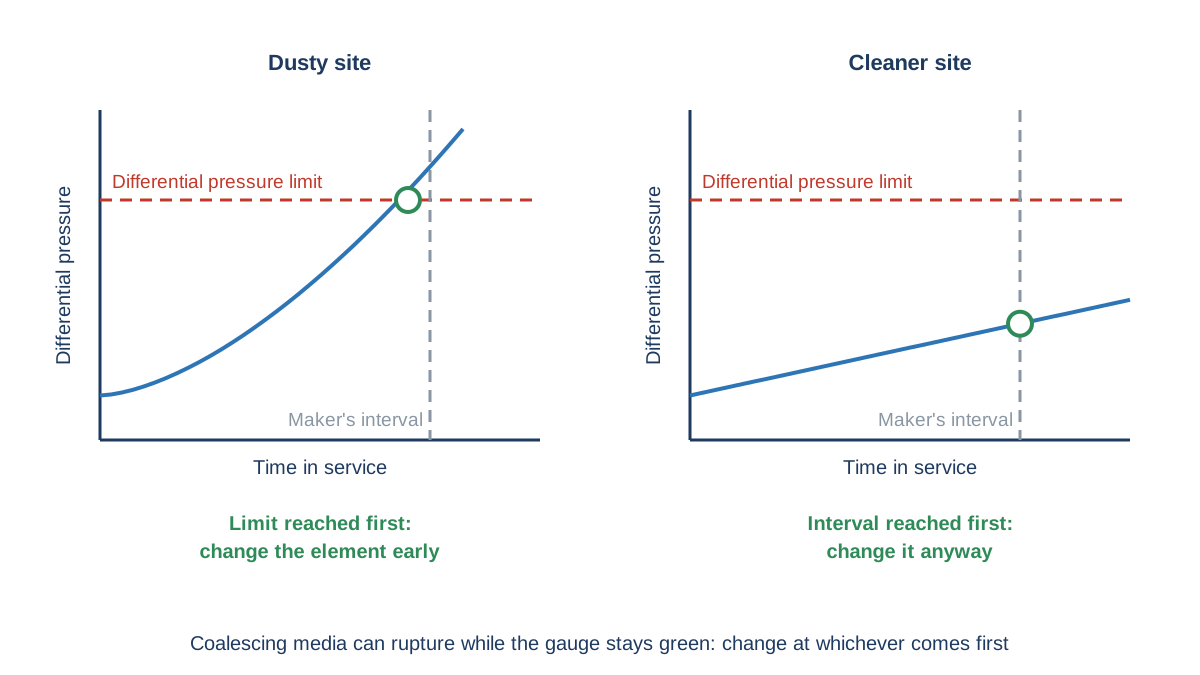
Elements need changing for two separate reasons: blockage and loss of performance. As an element loads with dirt, its pressure drop rises and the compressor works harder to compensate. A filter whose drop rises from 50 kPa (0.5 bar) clean to 90 kPa (0.9 bar) dirty typically adds 2 to 2.5% to energy use at full compressor capacity (NSW Office of Environment and Heritage 2017). The same guide recommends changing elements as the filter manual specifies, with main line filters changed during compressor servicing.
A differential pressure gauge only tells part of the story. Parker Hannifin (2010) describes these gauges as indicators of premature blockage, not as filter service or air quality indicators. Coalescing media can rupture while the needle stays in the green. For that reason, makers set a time-based interval as well. One maker sets a 12 month interval for its general purpose and high efficiency coalescing elements (Parker Hannifin 2019), and Atlas Copco (n.d.) recommends changing filter elements at least every 12 months, sooner in dusty environments. Replace at whichever comes first: the maker's interval or the differential pressure limit.
Checks and common mistakes
The most common mistake is matching on size alone. Two elements can share dimensions but differ in grade, so a fit is not the same as a match. Others include reusing old O-rings, fitting an element upside down against its flow arrow, and ordering from a faded label without checking the housing model. Breathing air purifiers need extra care, because their elements and catalysts protect people and are often specified as a set. See What is a Hopcalite Filter? before changing one.
When to call a specialist
Ask for help when you cannot read either label, when the housing is damaged or corroded, or when the filter serves breathing air, food contact or medical applications. A supplier can confirm the match from photos and dimensions, and a qualified person should confirm the grade for critical air.
Frequently asked questions
Can I fit a different grade in the same housing?
Often the housing will physically accept several grades. Whether you should depends on the air quality the process needs, so check with a qualified person before changing grade.
How often should I change a compressed air filter element?
Follow the maker's interval and change earlier if the differential pressure reaches its limit. Twelve months is a common maker's interval for coalescing elements.
What if the Filter Finder does not find my part number?
Send the part number and a photo of the label to the Ultramax sales team or call a branch. Include the housing model and your measurements to speed up the match.
Related reading
- Coalescing filters explained: what they do and why you need one
- Understanding ISO 8573-1:2010 and the importance of compressed air quality
- What is a Hopcalite Filter?
- Water in Air Tools: Causes and Fixes
References
- Atlas Copco. n.d. "Why Change Your Compressed Air Inline Filter Regularly?" Atlas Copco blog. Accessed 15 October 2026. https://atlascopco.com/en-ae/compressors/air-compressor-blog/why-change-your-compressed-air-inline-filter-regularly.
- ISO (International Organization for Standardization). 2007. ISO 12500-1:2007 Filters for Compressed Air: Test Methods, Part 1: Oil Aerosols. Geneva: ISO. https://www.iso.org/standard/41150.html.
- ISO (International Organization for Standardization). 2009. ISO 12500-3:2009 Filters for Compressed Air: Test Methods, Part 3: Particulates. Geneva: ISO. https://www.iso.org/standard/44113.html.
- ISO (International Organization for Standardization). 2010. ISO 8573-1:2010 Compressed Air, Part 1: Contaminants and Purity Classes. Geneva: ISO. https://www.iso.org/standard/46418.html.
- NSW Office of Environment and Heritage. 2017. Low Capital Cost, Simple Solutions to Improve the Efficiency of Your Compressed Air System. OEH2017/0257. Hosted by Energy NSW. https://www.energy.nsw.gov.au/sites/default/files/2022-08/2017_NSW_CompressedAirGuidepdf.pdf.
- Parker Hannifin. 2010. Why Should I Change My Filter Element? Catalogue 174004454_01_EN. Gateshead: Parker Hannifin, domnick hunter Industrial Division. https://pharmaceutical.yodify.com/Documentation/Document/jOrXV/322360-Why-should-I-change-my-compressed-air-filter-element-English-PDF-6.pdf.
- Parker Hannifin. 2019. OIL-X Die-Cast Aluminium Compressed Air Filters, Grade AO and Grade AA. Product information PISOILXDCAOAA-00-EN. https://pharmaceutical.yodify.com/Documentation/Document/JlJYA/PISOILXDCAOAA-00-EN.pdf.
- SafeWork NSW. n.d. Isolation of Plant: Lock-Out / Tag-Out. Fact sheet SW09240. Accessed 15 October 2026. https://www.safework.nsw.gov.au/__data/assets/pdf_file/0010/586342/factsheet-isolation-of-plant.pdf.
This article is general information only. Check manufacturer documentation and applicable Australian Standards for your installation.